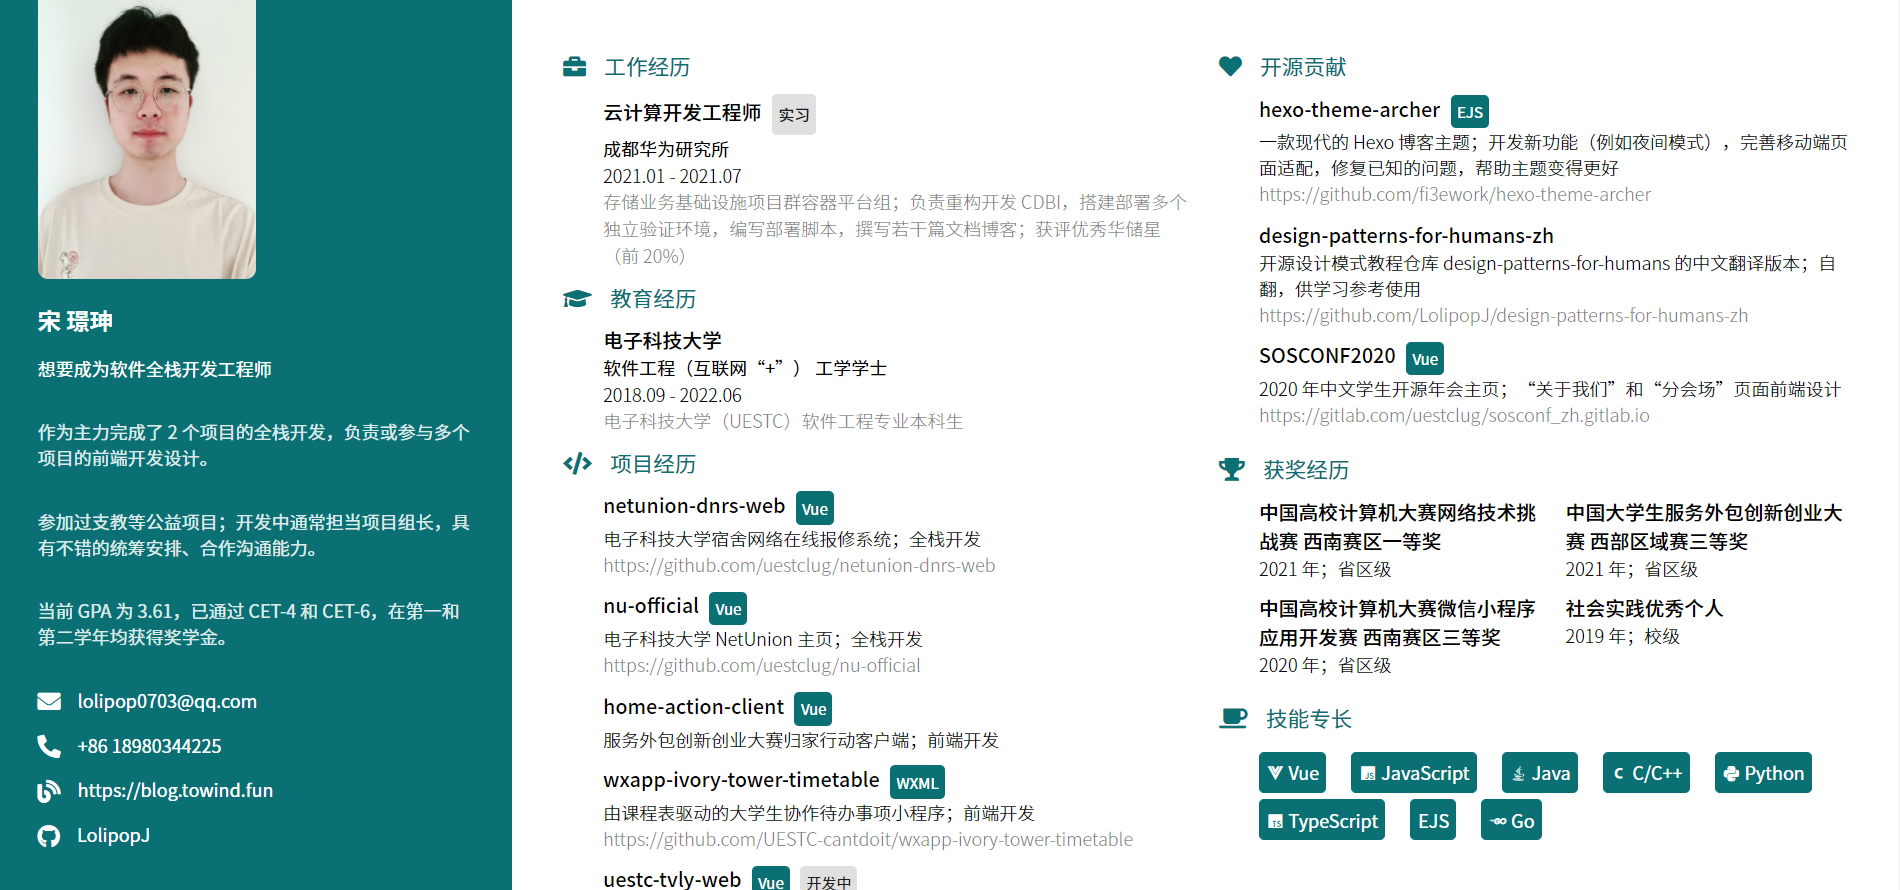
去年投简历的时候,在 Github 上找了个开源的,星星很多的仓库 best-resume-ever 来制作自己的简历。其中的 Creative 模板我觉得很喜欢,就用它制作了我人生中的第一份找工作用的简历:
然后到了现在,到了秋招真正找工作走向社会的季节了,又该制作自己的简历了。一年的时光给自己的人生又增添了几分色彩,原先简历模板已然不够用了。正巧,这个仓库由 Vue 编写,可以用自己已有的知识对简历做一些改造手术。
改造简历 举四个改造的例子好了。
添加 Chip 纸片 在 Creative 模板的技能专长栏目中,使用了纸片的形式展示比较擅长的编程语言,很好看!为纯纯的文字多增添了些不一样的色彩。
而在项目经历栏目中,为每一个项目提供了 platform 属性,也就是项目基于的语言或平台等。但是这一个属性是以文字的形式展示的,我觉得并不好看,在颜色上也没有突出的作用。于是我计划使用纸片的形式在展示 platform 属性。
模仿我经常使用的 Vue UI 组件库 Vuetify 的编写,添加样式表类如下:
1
2
3
4
5
6
7
8
9
10
11
12
13
14
15
16
.chip { display : inline-block; color : white; background-color : @accent-color ; overflow : hidden; vertical-align : middle; padding : 5px ; margin-left : 5px ; border-radius : 4px ; font-size : 0.8em ; & -secondary { color : rgba (0 , 0 , 0 , 0.87 ); background-color : #e0e0e0 ; } }
其中 .chip 为默认的纸片样式表,使用主题色作为背景,白色作为文本颜色;而 .chip-secondary 可以覆盖原有的配色,使用灰色作为背景,黑色作为文本颜色。
添加 Vue 模板代码如下,当 platform 属性不为空时,显示拥有 platform 内容的纸片;当 dev 属性不为空时,显示有“开发中”文本的次要配色的纸片。
1 2 <span v-if ="project.platform" class ="chip" > {{ project.platform }}</span > <span v-if ="project.dev" class ="chip chip-secondary" > {{ lang.underDev }}</span >
显示的结果如下:
修改页面布局 这个项目里的所有主题基于 A4 纸张(21 * 29.7cm)设计:
1 2 3 4 5 6 7 .page { width : 21cm ; height : 29.68cm ; }
现在互联网企业的简历大多使用专门的招聘网站上传提交,似乎不必拘泥于 A4 纸的大小了。电脑屏幕那么大,何不将整个简历直接“贴脸上”呢!
首先将页面的宽度和高度设置为 100%,即宽度覆盖整个浏览器,高度足以容纳所有简历上所有内容。
然后利用省心的 Flex 布局,将页面右边的正文内容分为左右两栏。
编写页面的布局形如:
1 2 3 4 5 6 7 <div class ="resume" > <div class ="left-column" > </div > <div class ="right-column" > <div class ="right-column-section" > </div > <div class ="right-column-section" > </div > </div > </div >
样式表内容形如:
1
2
3
4
5
6
7
8
9
10
11
12
13
14
15
16
17
18
.resume { display : flex; } .left-column { flex : 1 ; } .right-column { flex : 3 ; display : flex; justify-content : space-around; } .right-column-section { flex : 0 0 48% ; }
现在我的简历看上去就显得很大气了:
但是,使用 Flex 布局把 right-column 分成的两栏,如果两边刚好高度差不多,那便没有什么问题;但如果某一栏比另一栏高很多,页面就会显得参差不齐。手动把一些元素挪到另一栏似乎能够解决这个问题,但在实现上非常不优雅。
因此,后来我选用了 Multiple-column 布局作为 right-column 的布局。
编写页面的布局形如:
1 2 3 4 <div class ="resume" > <div class ="left-column" > </div > <div class ="right-column" > </div > </div >
样式表内容形如:
1
2
3
4
5
6
7
8
9
10
11
12
13
14
15
.resume { display : flex; } .left-column { flex : 1 ; } .right-column { flex : 3 ; display : block; column-count : 2 ; column-gap : 4% ; }
还有个小问题,我希望我的项目经历中的每一段经历都是完整的,内容不随着分栏分离。只需要为它们设置 break-inside: avoid; 即可:
1
2
3
.section-content__item { break-inside : avoid; }
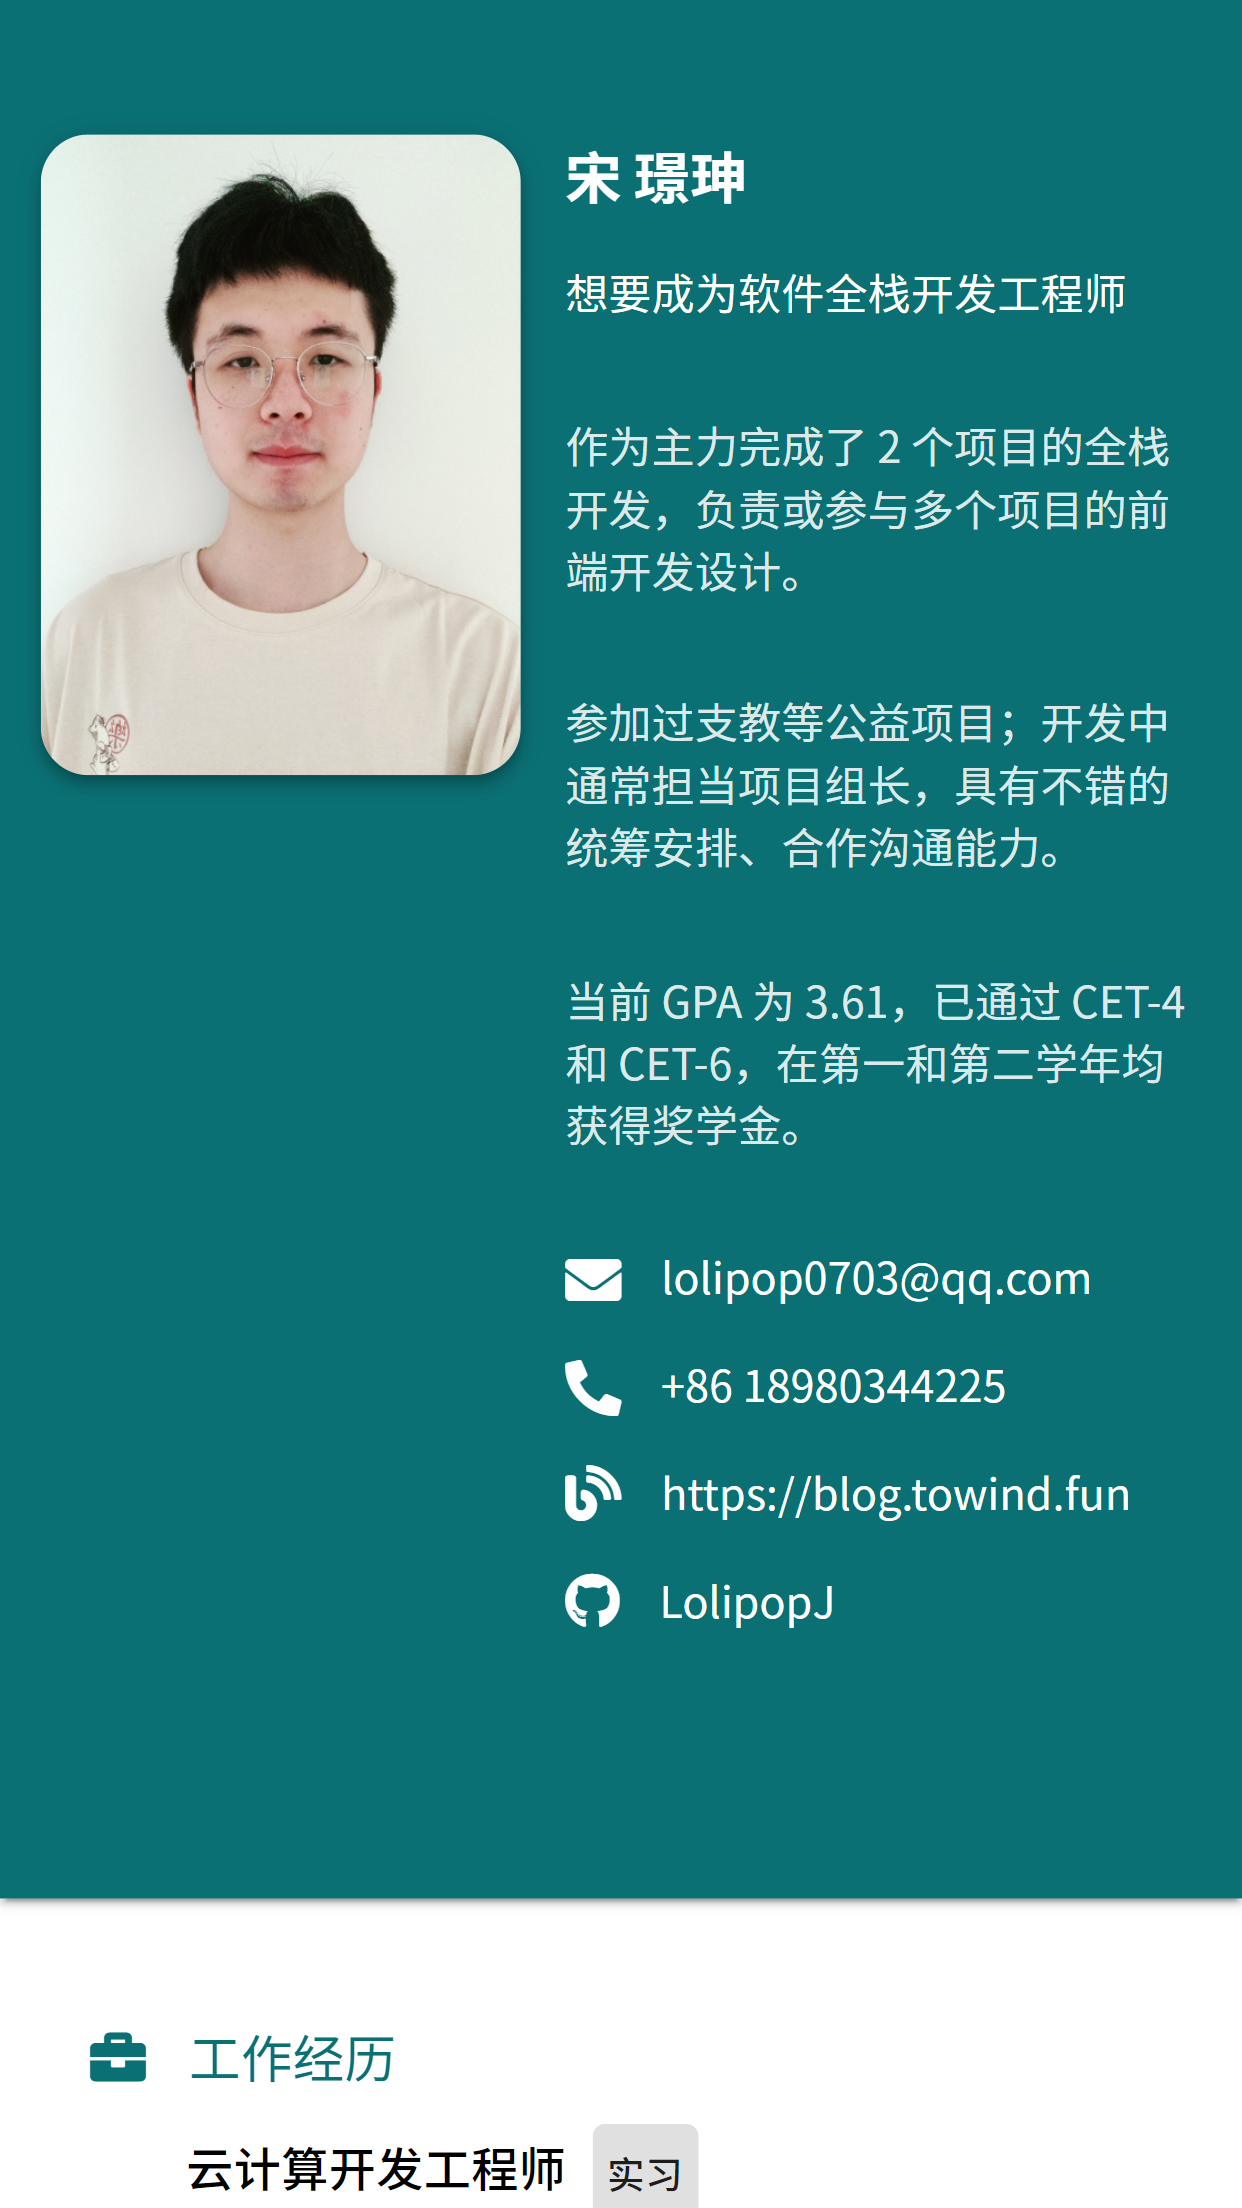
适配移动端界面 既然计划部署为网页,那么横向三栏的设计显然对移动端设备很不友好。
如果网页和右栏均为 Flex 布局,可以使用 flex-direction 来快速调整页面布局的方向。编写样式表代码如下:
1
2
3
4
5
6
7
8
9
@media (max-width : 960px ) { .resume { flex-direction : column; } .right-column { flex-direction : column; } }
Easy as a cake. 当页面宽度小于 960px 时,将把原有的三栏纵向依次排列出来。效果如下:
如果网页为 Flex 布局,右栏为 Multiple-column 布局,修改网页的 flex-direction 和右栏的 column-count 即可:
1
2
3
4
5
6
7
8
9
@media (max-width : 960px ) { .resume { flex-direction : column; } .right-column { column-count : 1 ; } }
添加夜间模式 使用 CSS 提供的 CSS Variables 能力来实现页面的主题切换,其浏览器兼容性见于此 。
首先创建一个主题配置文件 src/assets/themes.json 来存储不同主题的颜色,例如:
1
2
3
4
5
6
7
8
9
10
{ "light" : { "backgroundColor" : "#fafafa" , "textColor" : "rgba(0, 0, 0, 0.87)" } , "dark" : { "backgroundColor" : "#121212" , "textColor" : "rgba(255, 255, 255, 0.87)" } }
编写 Vue 脚本如下:
1
2
3
4
5
6
7
8
9
10
11
12
13
14
15
16
17
18
19
20
21
22
23
24
25
26
27
<script> const themes = require ("@/assets/themes" );export default { data ( return { themeMode : "light" , }; }, methods : { setThemeMode (mode ) { this .themeMode = mode; document .documentElement .style .setProperty ( "--theme-background-color" , themes[mode].backgroundColor ); document .documentElement .style .setProperty ( "--theme-text-color" , themes[mode].textColor ); }, }, created ( this .setThemeMode ("light" ); }, } </script>
当我们执行 this.setThemeMode("light") 时,相当于覆盖(或添加)了如下的 CSS 样式表:
1
2
3
4
:root { --theme-background-color : #fafafa ; --theme-text-color : rgba (0 , 0 , 0 , 0.87 ); }
同理,当未来执行 this.setThemeMode("dark") 时,则会把之前在 src/assets/themes.json 配置的颜色覆盖到此处。
最后,只需要用上我们定义好的这些 CSS 变量就可以了,例如:
1
2
3
4
5
6
7
.resume { color : var (--theme-text-color); } .right-column { background-color : var (--theme-background-color); }
部署为静态网页 这个项目从 2017 年开始,到现在差不多 4 年的时间。从现在的角度来看,它依赖了许多不必要,或是已废弃的包,这是自然。
因此,我想将简历页面从这个项目分离出来,独立为一个简单的 Vue 项目。最重要的是,自从用上了 npm-check-updates 这个库,我的追新强迫症就越来越看不得这么多可以升级的依赖。
使用 Vue CLI 打包 Vue 项目 Vue CLI 提供了 Vue 项目从开发到打包为静态文件并部署的全套解决方案。
总之先全局安装 Vue CLI:
1
2
3
4
5
6
PS C:\Users\Lolipop\Github> yarn global add @vue/cli ... PS C:\Users\Lolipop\Github> C:\Users\Lolipop\AppData\Local\Yarn\bin\vue.cmd --version @vue/cli 4.5.13
创建新的 Vue 项目:
1 PS C:\Users\Lolipop\Github> C:\Users\Lolipop\AppData\Local\Yarn\bin\vue.cmd create resume
习惯性更新依赖为最新版本:
1
2
3
4
5
6
7
8
9
10
11
12
13
14
15
16
17
18
19
20
21
22
PS C:\Users\Lolipop\Github> cd resume PS C:\Users\Lolipop\Github\resume> ncu -u -t minor Using yarn Upgrading C:\Users\Lolipop\Github\resume\package.json [====================] 17/17 100% @vue/cli-plugin-babel ~4.5.0 → ~4.5.13 @vue/cli-plugin-eslint ~4.5.0 → ~4.5.13 @vue/cli-plugin-router ~4.5.0 → ~4.5.13 @vue/cli-service ~4.5.0 → ~4.5.13 eslint ^6.7.2 → ^6.8.0 eslint-plugin-prettier ^3.3.1 → ^3.4.0 less ^3.0.4 → ^3.13.1 prettier ^2.2.1 → ^2.3.2 vue-template-compiler ^2.6.11 → ^2.6.14 core-js ^3.6.5 → ^3.16.2 vue ^2.6.11 → ^2.6.14 vue-router ^3.2.0 → ^3.5.2 Run yarn install to install new versions. PS C:\Users\Lolipop\Github\resume> yarn install
启动项目服务端渲染,确保能正常运行:
1 PS C:\Users\Lolipop\Github\resume> yarn serve
将原有的 Vue 文件移动过来,处理发生错误的依赖关系,再根据需要安装必要的其它依赖。
别忘了配置 vue.config.js 中的 publicPath 项。我们的项目将部署在域名的根路径,例如 https://lolipopj.github.io/resume,因此需要配置如下:
1 2 3 4 module .exports = { publicPath : process.env .NODE_ENV === "production" ? "/resume/" : "/" , };
Okay… 一切就绪,最后只需要执行:
1
2
3
4
5
6
7
PS C:\Users\Lolipop\Github\resume> yarn build ... DONE Build complete. The dist directory is ready to be deployed. INFO Check out deployment instructions at https://cli.vuejs.org/guide/deployment.html Done in 14.90s.
Beatiful. 现在,只需要将 dist/ 目录下的静态资源部署即可。
部署 Github page 一如既往,主分支的提交触发 Github Actions,自动执行打包构建操作,并将它们上传到 gh-pages 分支,部署为 Github page。
首先创建一个 Personal access token ,赋予 repo 的所有权限。在仓库的 Secrets 处添加新的秘密,命名为例如 ACCESS_TOKEN。将刚刚创建的 token 作为此秘密的值即可。
创建并编写 .github/workflows/deploy.yml 如下:
1
2
3
4
5
6
7
8
9
10
11
12
13
14
15
16
17
18
19
20
21
22
23
24
25
26
27
28
29
30
31
32
33
34
35
36
name: Resume Deployment on: push: branches: - main jobs: pages: runs-on: ubuntu-latest steps: - uses: actions/checkout@v2 - name: Use Node.js 14. x uses: actions/setup-node@v1 with: node-version: "14.x" - name: Cache NPM dependencies uses: actions/cache@v2 with: path: node_modules key: ${{ runner.OS }}-npm-cache restore-keys: | ${{ runner.OS }}-npm-cache - name: Install Dependencies run: | npm install - name: Build run: | npm run build - name: Deploy uses: peaceiris/actions-gh-pages@v3 with: github_token: ${{ secrets.GITHUB_TOKEN }} personal_token: ${{ secrets.ACCESS_TOKEN }} publish_dir: dist publish_branch: gh-pages
提交代码!现在,我的简历顺利部署到了 Github page 上。
导出简历 PDF 文件 或许直接将简历网站地址发送给 HR 很酷,但是招聘系统还是需要我提交简历的 PDF 文档。
接下来的内容主要参考了 best-resume-ever 已有的实现 。
知名的 puppeteer 项目可以帮助我们生成页面的 PDF 文档,让我们开始吧:
1 PS C:\Users\Lolipop\Github\resume> yarn add -D puppeteer@10.2.0
由于我们需要先启动本地服务,才能用 puppeteer 访问。这意味着我们需要先执行 yarn serve 命令,当服务启动成功后,再执行后续的操作。我们可以通过 concurrently 和 rxjs 实现:
1 PS C:\Users\Lolipop\Github\resume> yarn add -D concurrently@6.2.1 rxjs@7.3.0
concurrently 可以在一个终端中同时运行多个命令,一旦某个命令运行失败,便中止刚刚当前终端运行的所有命令。
假设我们编写的脚本文件为 scripts/export.js,那么在 package.json 中可以添加这样一条命令:
1
2
3
4
5
{ "scripts" : { "export" : "concurrently \"npm run serve\" \"node scripts/export.js\" --success first --kill-others" } }
我们将依次执行 npm run serve 和 node scripts/export.js。当第一条命令成功时返回 0,失败时返回 1。任意一条命令结束或失败时中止此脚本。
rxjs 是一个用于编写异步、事件驱动的程序的库,我们可以使用它来监听页面是否就绪,避免在尚未加载完成的情况下就打印简历 PDF 文档:
1
2
3
4
5
6
7
8
9
10
11
12
13
14
15
16
17
18
19
20
21
22
23
24
25
26
27
28
29
30
31
32
33
34
35
36
37
const http = require ("http" );const { interval } = require ("rxjs" );const { filter, first, mergeMap } = require ("rxjs/operators" );const config = require ("../config" );const port = config.DEV_PORT ;const fetchServeResponse = ( return new Promise ((res, rej ) => { try { const req = http.request (`http://localhost:${port} /` , (response ) => res (response.statusCode ) ); req.on ("error" , (err ) => rej (err)); req.end (); } catch (err) { rej (err); } }); }; const waitForServerReady = ( return interval (1000 ).pipe ( mergeMap (async () => { try { const statusCode = await fetchServeResponse (); if (statusCode === 200 ) { return true ; } return false ; } catch (err) { return false ; } }), filter ((ok ) => !!ok) ); };
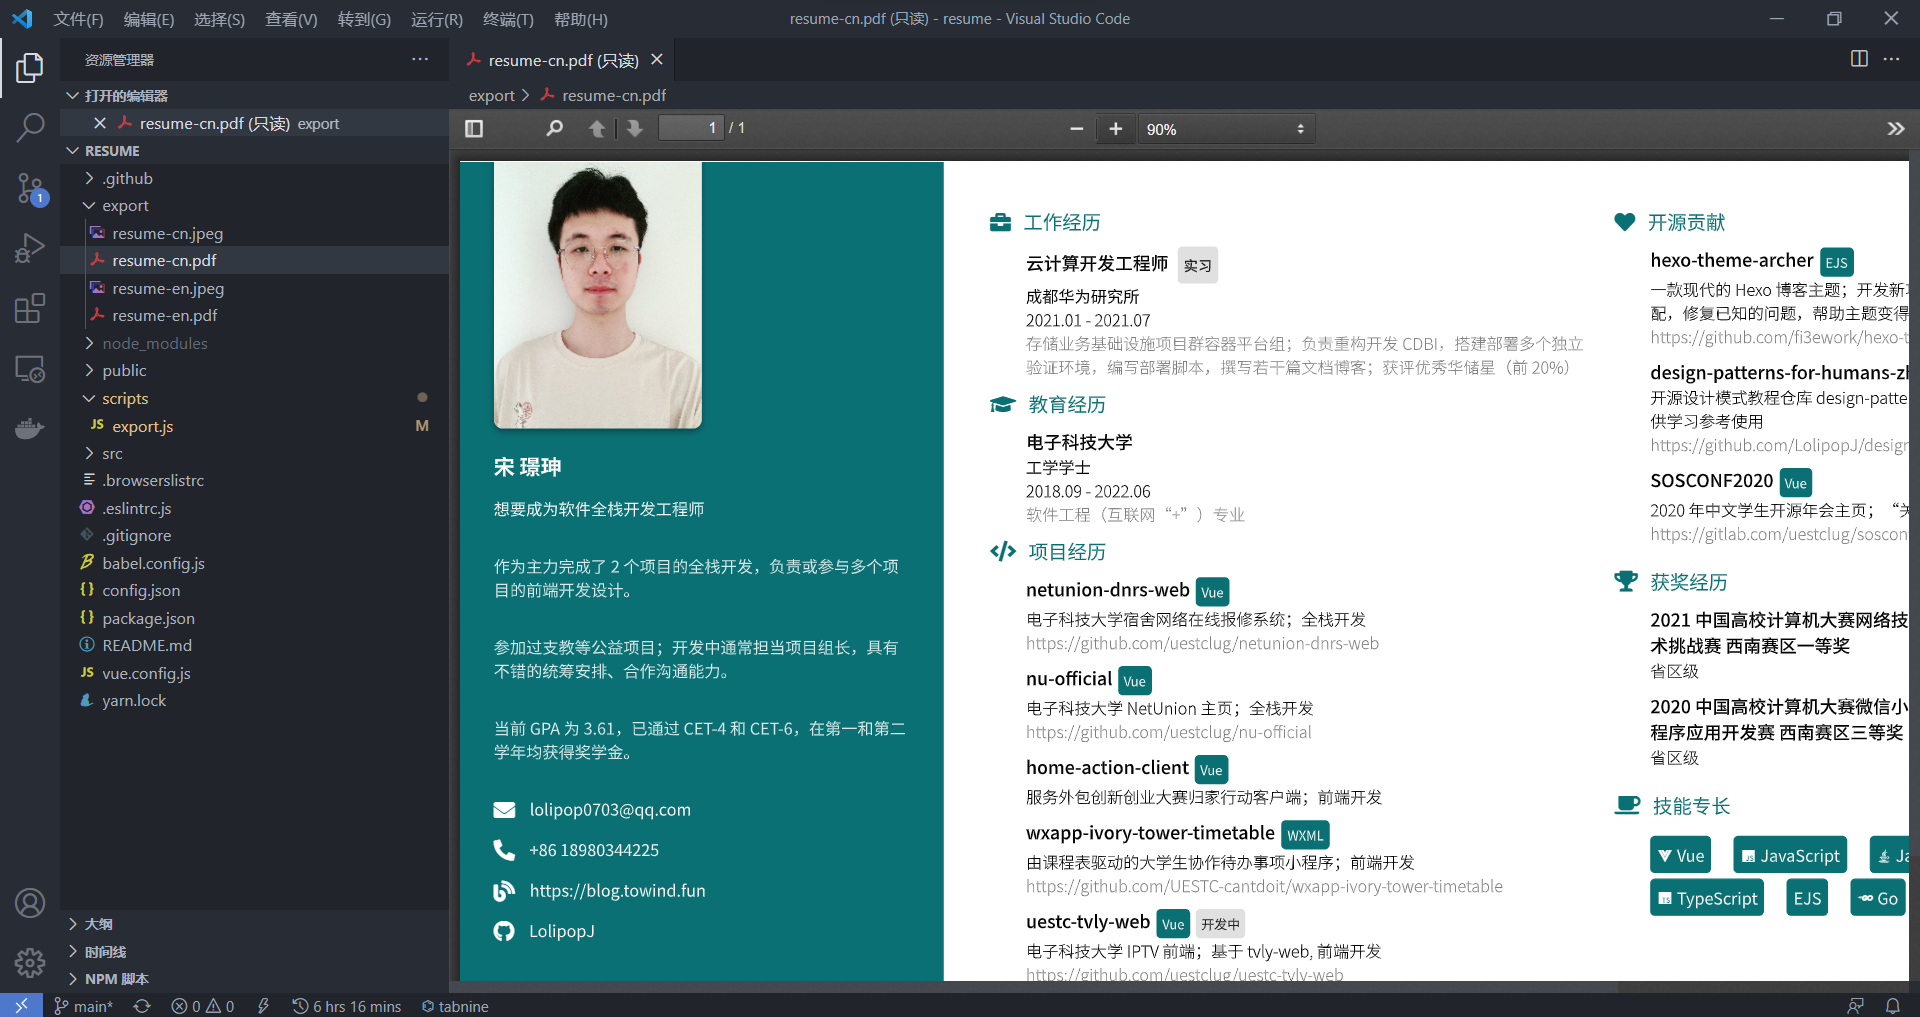
接下来,利用 puppeteer 的强大功能,打印出简历的 PDF 文档,顺便再给屏幕截个图好了:
1
2
3
4
5
6
7
8
9
10
11
12
13
14
15
16
17
18
19
20
21
22
23
24
25
26
27
28
29
30
31
32
33
34
35
36
37
38
39
40
41
42
43
44
45
46
47
48
49
50
51
52
53
54
55
56
57
58
59
60
61
62
63
64
65
66
67
68
69
70
71
72
73
74
75
76
77
78
79
80
81
82
83
84
85
86
87
88
89
90
const puppeteer = require ("puppeteer" );const path = require ("path" );const fs = require ("fs" );const config = require ("../config" );const port = config.DEV_PORT || 8088 ;const defaultScreenshotWidth = config.EXPORT_SCREENSHOT_WIDTH || 1600 ;const defaultScreenshotHeight = config.EXPORT_SCREENSHOT_HEIGHT || 1000 ;const defaultPdfWidth = config.EXPORT_PDF_WIDTH || 1600 ;const defaultPdfHeight = config.EXPORT_PDF_HEIGHT || 1000 ;const { lastValueFrom } = require ("rxjs" );const { first } = require ("rxjs/operators" );const convert = async function ( await lastValueFrom (waitForServerReady ().pipe (first ())); console .log ("Connected to server ..." ); console .log ("Exporting ..." ); try { const savePath = path.join (__dirname, "../export/" ); if (!fs.existsSync (savePath)) { fs.mkdirSync (savePath); } const exportResume = async function ({ code = "cn" , screenshotFullPage = true , screenshotQuality = 100 , } ) { const url = `http://localhost:${port} /#/${code} ?exportMode=true` ; const filename = `resume-${code} ` ; const codeUpperCase = code.toUpperCase (); const screenshotWidth = config[`EXPORT_SCREENSHOT_WIDTH_${codeUpperCase} ` ] || defaultScreenshotWidth; const screenshotHeight = config[`EXPORT_SCREENSHOT_HEIGHT_${codeUpperCase} ` ] || defaultScreenshotHeight; const pdfWidth = config[`EXPORT_PDF_WIDTH_${codeUpperCase} ` ] || defaultPdfWidth; const pdfHeight = config[`EXPORT_PDF_HEIGHT_${codeUpperCase} ` ] || defaultPdfHeight; const browser = await puppeteer.launch ({ args : ["--no-sandbox" ], defaultViewport : { width : screenshotWidth, height : screenshotHeight, }, }); const page = await browser.newPage (); await page.goto (url, { waitUntil : "networkidle0" , }); await page.screenshot ({ path : `${savePath} ${filename} .jpeg` , fullPage : screenshotFullPage, quality : screenshotQuality, }); await page.pdf ({ path : `${savePath} ${filename} .pdf` , width : pdfWidth, height : pdfHeight, }); await browser.close (); }; await exportResume ({ code : "cn" , }); await exportResume ({ code : "en" , }); } catch (err) { console .log ("Export failed." ); throw new Error (err); } console .log ("Finished exports." ); };
在 URL 的结尾我设置了 ?exportMode=true,供 Vue Router 查询使用。正常访问网页时,默认为「非导出模式」,网页上会显示切换语言和切换夜间模式按钮等;使用此脚本时,访问的网页为「导出模式」,隐藏掉不必要的内容。
然后又到了爷最喜欢的约定大于配置 环节,在上面的代码里,假设每个翻译版本的简历有不同的 URL 值,对应不同的 code。例如 http://localhost:8088/#/cn 为简历的中文版本,对应的 code 值为 cn。这样,最终导出文件为 export/resume-cn.jpeg 和 export/resume-cn.pdf。
如果需要配置不同翻译版本的简历的 PDF 文档(或截图)的大小,可以在 config.json 中配置。例如需要配置中文版本简历 PDF 文档的高度,设置 "EXPORT_PDF_HEIGHT_CN": 850 即可,其中 _CN 为 code 的大写值前面加上短横线。
不过,手动配置打印 PDF 高度在实现上并不优雅,仔细想想,既然 puppeteer 能够模仿浏览器中的所有行为,那么:在固定页面宽度的情况下,获取当前页面的高度也是理所应当能够做到的吧。page.evaluate()
1
2
3
4
5
6
7
8
9
10
11
12
13
14
15
16
17
18
19
20
21
22
const exportResume = async function ({ autoFitPdf = true } ) { const pdfHeight = autoFitPdf ? await page.evaluate(() => { const body = document .body , html = document .documentElement ; const pageHeight = Math .max ( body.scrollHeight , body.offsetHeight , html.clientHeight , html.scrollHeight , html.offsetHeight ); return pageHeight + 10 ; }) : config[`EXPORT_PDF_HEIGHT_${codeUpperCase} ` ] || defaultPdfHeight; };
完整的脚本文件见于此 。
最后,见证劳动的成果吧。执行刚刚我们编写的脚本:
1
2
3
4
5
6
7
8
9
10
11
12
13
14
15
16
17
18
19
20
PS C:\Users\Lolipop\Github\resume> yarn export ... [0] <s> [webpack.Progress] 100% [0] [0] [0] [0] App running at: [0] - Local: http://localhost:8088/ [0] - Network: http://192.168.237.206:8088/ [0] [0] Note that the development build is not optimized. [0] To create a production build, run yarn build. [0] [1] Connected to server ... [1] Exporting ... [1] Finished exports. [1] node scripts/export.js exited with code 0 --> Sending SIGTERM to other processes.. [0] npm run serve exited with code 1 Done in 42.14s.
为了避免导出失败或异常,在此期间应避免修改页面源文件。
顺利地导出了我的简历,此外还有截图和英文版本: