本文旨在基于 Koa 从零开始搭建一个简单的 Telegram Bot 应用服务,帮助笔者更好地将爱传递给 Telegram!
本文假设您已对 Node.js 和 Koa 有一定的了解。
初始化 Koa 项目 Koa 是为 Node.js 设计的下一代 Web 框架,其幕后开发者主要来自知名的 Express 团队。
尽管使用 koa-generator 来初始化 Koa 项目是一个不错的选择,但笔者还是喜欢从头开始的感觉。
那么首先,新建文件夹并进入,使用 npm init 初始化 package.json。
安装必要的依赖:
1 npm install koa koa-router koa-bodyparser dotenv
安装开发依赖:
安装服务器部署时使用的依赖:
为了简便,这里笔者使用了别人进行封装后的 Telegram Bot API 库 node-telegram-bot-api :
1 npm install node-telegram-bot-api
规划项目目录结构大致如下:
1
2
3
4
5
6
7
8
9
10
11
. ├── .env ├── app.js ├── package.json ├── bin │ └── www.js └── routes │ └── index.js └── service ├── bot.js └── index.js
其中,.env 为环境配置文件,包括 Telegram Bot Token 在内的信息在此处配置;bin/www.js 为项目启动时执行的文件,这意味着在配置脚本命令时,应当使用 nodemon bin/www 及 pm2 start bin/www;routes 目录为路由目录,用来存放可调用的接口;最后,service 目录为服务目录,在这里连接 Bot 和数据库,并执行定时任务。
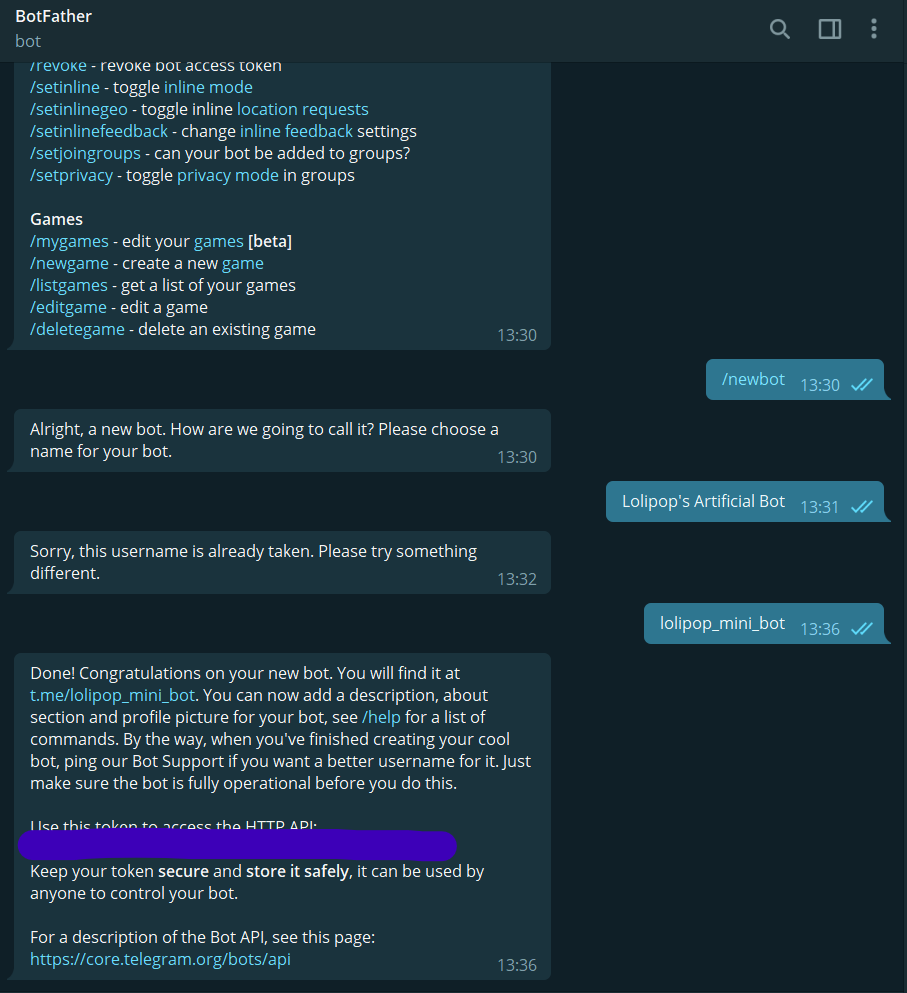
连接到 Telegram Bot 创建新的 Bot 首先,通过在 Telegram 上与 BotFather 交互,创建一个新的 Telegram Bot。
记录下当中的 HTTP API 的值即 Telegram Bot Token,作为项目的环境变量保存,切勿上传到远程代码仓库中。
1 const token = process.env .TELEGRAM_BOT_TOKEN ;
与 Bot 建立连接 我们的项目可能无法直接访问到 Telegram 的服务器,可以使用 SOCKS5 代理
1
2
3
4
5
6
7
8
9
10
11
12
13
14
15
16
17
const TelegramBot = require ("node-telegram-bot-api" );const proxySocks5Agent = require ("socks5-https-client/lib/Agent" );requestOptions = { agentClass : proxySocks5Agent, agentOptions : { socksHost : process.env .PROXY_SOCKS5_HOST , socksPort : process.env .PROXY_SOCKS5_PORT , socksUsername : process.env .PROXY_SOCKS5_USERNAME , socksPassword : process.env .PROXY_SOCKS5_PASSWORD , }, }; const bot = new TelegramBot (token, { polling : true , request : requestOptions, });
如何 SOCKS5 工作不正常(这是 一个可能的原因),也可以尝试使用 HTTP 代理 :
1
2
3
4
5
6
7
8
9
10
const TelegramBot = require ("node-telegram-bot-api" );requestOptions = { proxy : process.env .PROXY_HTTP , }; const bot = new TelegramBot (token, { polling : true , request : requestOptions, });
对 Bot 进行测试,添加如下代码:
1 2 3 4 bot.onText (/\/start/ , (msg ) => { bot.sendMessage (msg.chat .id , "Hi, this is Telly Bot!" ); });
打开 Telegram,对 Bot 发送 /start,看看是否会得到 Hi, this is Telly Bot! 的回应。
使用网络钩子与 Bot 交互 Telegram Bot 可以通过轮询(polling)和网络钩子(webhook)两种不同的方式来获取用户发送的消息,在前面的代码中,我们使用的是轮询的方式。
轮询的方式无需额外的配置,更适合本地快速进行开发测试;而网络钩子的方式更适合项目部署。那么,一个健全的 Telegram Bot 应当使用网络钩子 的方式来实现。
为了接收用户对 Telegram Bot 发送的消息,在网络钩子的方式中,我们需要一个 HTTPS 协议的公网地址 ,除了直接使用自己的服务器,还可以怎么办呢?别急,有 ngrok 为我们排忧解难:它是一款反向代理工具,可以将本地的地址映射到公网上去。
如上图所示,当 ngrok 运行时,Telegram Bot 发向 https://a75b-182-141-75-13.ngrok.io 的请求,将转发给运行在本地 http://localhost:4000 上的程序。
这样,只需要同时运行我们的项目和 ngrok,我们就可以正常地接收到信息并进行处理了。修改连接 Bot 的代码如下:
1
2
3
4
5
6
7
const bot = new TelegramBot (token, { request : requestOptions, }); bot.setWebHook (`${process.env.WEBHOOK_HOST} /bot${token} ` ); globalThis.bot = bot;
现在,Telegram 上机器人收到的消息会立即发送给我们的服务器。最后,在服务器需要处理接收到的 POST 类型请求 /bot${TELEGRAM_BOT_TOKEN},告知 Telegram 我们已经收到新的消息了。可以在 routes/index.js 中添加代码如下:
1 2 3 4 router.post (`bot${token} ` , (ctx ) => { globalThis.bot .processUpdate (ctx.request .body ); ctx.status = 200 ; });
需要补充的是,通过上面代码中 Bot API 库提供的 processUpdate
现在,我们的机器人将不再笨拙地轮询 Telegram 服务器,查看是否有未处理的消息,而是静静等待 Telegram 服务器发送过来的请求。
Bot 起始脚手架 万事俱备,接下来就是根据自己的需求进行开发的时间了。
这里 是笔者简单配置好的项目代码,可以作为 Start-up 供君参考。
获取 Github Issues 的评论并转发给 Telegram 频道 Chen 先生 自己的 Telegram 频道会定时发送他更新的推文,笔者也想整一个,最简单的实现方式是申请一个 Twitter 开发者账号,定时调用 API 获取最新推文信息即可 —— 但是没能申请到。暂退一步,先把笔者在 Github Issues 上的碎碎念同步给频道吧。
接下来的内容假设您已对 PostgreSQL 和数据库 ORM 工具有一定的了解。
连接到数据库 同步功能需要数据库的支持,当然也为了未来更多功能的实现,在这里,先与本机的数据库建立连接。以 PostgreSQL 为例,首先安装 node-postgres 库:
新建文件 config.js 来存储连接到数据库的配置:
1
2
3
4
5
6
7
8
9
10
11
12
13
14
const config = { database : { postgresql : { host : "localhost" , port : 5432 , database : "telly_bot_db" , user : "telly_bot_db_user" , password : "telly_bot_db_pwd" , timezone : "+08:00" , }, }, }; module .exports = config;
使用 ORM 管理数据库 通过 ORM 工具来对数据库进行管理与查询,可以避免手动运维的窘境。这里选用 Sequelize 库,安装必要的依赖:
1 npm install sequelize pg-hstore
修改 db/index.js 代码如下:
1
2
3
4
5
6
7
8
9
10
11
12
13
14
15
16
17
18
19
20
21
22
23
24
25
26
27
const { Sequelize } = require ("sequelize" );const pgsqlConfig = require ("../config" ).database .postgresql ;const options = { timezone : pgsqlConfig.timezone || "+08:00" , }; const sequelize = new Sequelize ( `postgres://${pgsqlConfig.user} :${pgsqlConfig.password} @${pgsqlConfig.host} :${pgsqlConfig.port} /${pgsqlConfig.database} ` , options ); (async () => { try { await sequelize.authenticate (); console .log ( `Connection with ${pgsqlConfig.database} has been established successfully.` ); await sequelize.sync ({ alter : true }); console .log ("All models were synchronized successfully." ); } catch (error) { console .error ( `Unable to connect to the database ${pgsqlConfig.database} :` , error ); } })(); module .exports = sequelize;
为了实现自动转发 Github Issues 中的评论,我们需要一张数据表来存储上一次转发的评论(或编辑记录)的最后更新日期 (lastUpdateCommentAt)。这样,下一次执行任务时,只需要查看该日期之后是否有新的评论(或编辑记录)就可以了。对于每一个 Issue,都会在该表中创建一条数据。为 Sequelize 添加模型 db/model/ServiceGithubIssueComment.js 如下:
1
2
3
4
5
6
7
8
9
10
11
12
13
14
15
16
17
18
19
20
21
22
23
24
25
26
27
28
29
30
31
32
const { DataTypes } = require ("sequelize" );module .exports = { id : { type : DataTypes .INTEGER , autoIncrement : true , primaryKey : true , }, issueUrl : { type : DataTypes .TEXT , allowNull : false , }, issueUserId : { type : DataTypes .ARRAY (DataTypes .TEXT ), }, forwardChannelId : { type : DataTypes .TEXT , allowNull : false , }, lastUpdateCommentAt : { type : DataTypes .DATE , }, lastExecServiceAt : { type : DataTypes .DATE , }, };
一个模型将成为数据库中的一张数据表。向 db/index.js 中添加如下代码:
1
2
3
const serviceGithubIssueCommentModel = require ("./model/ServiceGithubIssueComment" );sequelize.define ("ServiceGithubIssueComment" , serviceGithubIssueCommentModel);
注意,将模型绑定给 sequelize 对象的操作 sequelize.define() 需要放在 sequelize.sync() 方法之前。
当 sequelize.define() 执行完成后,我们可以随时使用 sequelize.models.ServiceGithubIssueComment 来获取模型实例。通过模型实例,我们就可以在对应的数据表中执行各种 SQL 查询语句了。
获取指定 Issue 中的最新评论 Github REST API 文档推荐使用 @octokit/core 库来执行请求:
1 npm install @octokit/core
向 config.js 中添加相应的配置。以获取笔者的碎碎念 为例:
1
2
3
4
5
6
7
8
9
10
11
12
13
14
15
16
17
const config = { github : { forwardIssueComment : { duration : 3600 , task : [ { owner : "LolipopJ" , repo : "LolipopJ" , issueNumber : 2 , issueUserId : [42314340 ], forwardChannelId : "@lolipop_thoughts" , since : "2022-01-01T00:00:00.000Z" , }, ], }, }, };
其中,duration 为两次执行期间间隔的时间(秒)。此外,配置中存在 issueUserId 项,这是因为我们可能只想要转发自己发送的评论,在后面只需要根据该项过滤该用户 ID 的评论即可(可以通过 https://api.github.com/users/your_github_user_name 查看指定 Github 账户的 ID)。
这里 是获取指定 Issues 中的评论的方法。编写 service/github.js 代码如下(仅做参考 :代码截取实现功能的部分,刨除提高鲁棒性的部分,也去除了第一次执行的部分):
1
2
3
4
5
6
7
8
9
10
11
12
13
14
15
16
17
18
19
20
21
22
23
24
25
26
27
28
29
30
31
32
33
34
35
36
37
38
39
40
41
42
43
44
45
46
47
48
49
50
51
52
53
54
55
56
57
58
59
60
61
62
63
64
65
66
67
68
69
70
71
const { Octokit } = require ("@octokit/core" );const config = require ("../config" ).github ;const octokit = new Octokit (octokitOptions);const bot = globalThis.bot ;const sequelize = globalThis.sequelize ;const forwardGithubIssueComment = async function ( const issues = config.forwardIssueComment .task ; const ServiceGithubIssueComment = sequelize.models .ServiceGithubIssueComment ; for (const issue of issues) { const owner = issue.owner ; const repo = issue.repo ; const issueNumber = issue.issueNumber ; const forwardChannelId = issue.forwardChannelId ; const issueUserId = issue.issueUserId ; const issueUrl = `${owner} /${repo} /issues/${issueNumber} ` ; const queryConfig = { issueUrl, issueUserId, forwardChannelId, }; const perPage = 100 ; let page = 0 ; const issueServiceInfo = await ServiceGithubIssueComment .findOne ({ where : queryConfig, }); const lastUpdateCommentDate = issueServiceInfo.dataValues .lastUpdateCommentAt ; const since = new Date ( new Date (lastUpdateCommentDate).getTime () + 1 ).toISOString (); let issueComments = []; while (issueComments.length === perPage * page) { ++page; const res = await octokit.request ( "GET /repos/{owner}/{repo}/issues/{issue_number}/comments" , { owner, repo, issue_number : issueNumber, since, per_page : perPage, page, } ); issueComments = issueComments.concat (res.data ); } if (Array .isArray (issueUserId) && issueUserId.length > 0 ) { issueComments = issueComments.filter ((comment ) => { const commentUserId = comment.user .id ; if (issueUserId.includes (commentUserId)) { return true ; } else { return false ; } }); } } };
如果 Issue 存放在私人仓库中,则需要用到 Personal Access Token 进行鉴权。在创建 octokit 对象时传递相应参数:
1
2
3
4
5
6
const octokitOptions = {};const authToken = process.env .GITHUB_PERSONAL_ACCESS_TOKEN ;if (authToken) { octokitOptions.auth = authToken; } const octokit = new Octokit (octokitOptions);
定时转发评论到 Telegram 频道 由于 Github Issues 中的评论为 Markdown 格式,在转发到频道时,就需要对内容进行解析。幸运的是,Telegram Bot 的 sendMessage()parse_mode 选项,可以将大部分 的 Markdown 内容顺利解析为正确的消息样式。但不幸的是,由于 Telegram 本身的一些限制,对于一些无法解析的符号会报错,针对这一部分评论,笔者选择直接发送评论的网页地址作为替代。
继续编写 service/github.js 代码如下(仅做参考 ):
1
2
3
4
5
6
7
8
9
10
11
12
13
14
15
16
17
18
19
20
21
22
23
24
25
26
27
28
29
30
if (issueComments.length > 0 ) { let lastUpdateCommentAt = new Date (0 ).toISOString (); for (const issueComment of issueComments) { try { await bot.sendMessage (forwardChannelId, issueComment.body , { parse_mode : "MarkdownV2" , }); } catch (error) { await bot.sendMessage (forwardChannelId, issueComment.html_url ); } const issueCommentUpdatedAt = issueComment.updated_at ; if (issueCommentUpdatedAt > lastUpdateCommentAt) { lastUpdateCommentAt = issueCommentUpdatedAt; } } await ServiceGithubIssueComment .update ( { lastUpdateCommentAt, lastExecServiceAt : new Date ().toISOString (), }, { where : queryConfig, } ); }
到这里,我们已经基本实现了所需要的全部功能。最后需要做的事情,就是设置每隔一定时间自动运行此服务,持续获取最新的评论信息。这里笔者用到了 toad-scheduler 库:
1 npm install toad-scheduler
在 service/index.js 中编写计划任务代码如下:
1
2
3
4
5
6
7
8
9
10
11
12
13
14
15
16
17
18
19
20
21
22
23
24
25
26
27
28
29
const { ToadScheduler , SimpleIntervalJob , AsyncTask , } = require ("toad-scheduler" ); const githubService = require ("./github" );const config = require ("../config" );const scheduler = new ToadScheduler ();const taskForwardGithubIssueComment = new AsyncTask ( "Forward Github Issue Comment" , async () => { await githubService.forwardGithubIssueComment (); }, (error ) => { console .error (error); } ); const jobForwardGithubIssueComment = new SimpleIntervalJob ( { seconds : config.github .forwardIssueComment .duration , runImmediately : true , }, taskForwardGithubIssueComment ); scheduler.addSimpleIntervalJob (jobForwardGithubIssueComment);
一切就绪,运行我们的 Bot 程序!
笔者的频道顺利收到了来自 Github Issue 中的评论信息!
仍然,该服务还有许多可以优化的地方,例如:当评论发生更新时,应编辑已发送的频道消息为最新评论内容,而不是重新发一条新的消息等。不再在此文赘述。
参考文章